Understanding Docker Multi-Stage Build
Docker Multi-Stage feature allows you to create small images with better caching and a small security footprint.

I am currently completing my bachelors in Artificial Intelligence from one of the most prestigious universities of Pakistan, FAST NUCES Islamabad Campus. I am excited to write on many such topics such as Artificial Intelligence, Devops, Docker to name a few
This blog is a sort of continuance of my previous blog which you can read here. There I covered the differences between virtualization and containerization, where to use them and how they are relevant in their ways. In this blog, I will talk about Dockerfile more specifically Multi-Stage Dockerfile, its benefits and how it is used in development and production environments.
Here is the table of contents for this blog
1. What is a Docker Image?
2. What is a Dockerfile?
3. Problems in Dockerfile
4. What is Docker multi-stage build?
5. Why use Multi-Stage build
6. Conclusion
1. What is a Docker Image?
Before explaining what Dockerfile is, it is important to understand what Docker image is. In simple terms, a Docker image is a file that is used to execute code in a Docker container.
2. What is a Dockerfile?
To containerize something via Docker we need to have/write a Dockerfile. Think of Dockerfile as a text document that contains the build instructions to build the image for a container. The advantage of a Dockerfile over just a simple binary image is that Dockerfile will ensure you have the latest version available. To ease the understanding of Dockerfile I will be creating a Docker container for a simple Flask application. Flask is a lightweight Python Framework for web applications. The code for the flask application is given below.
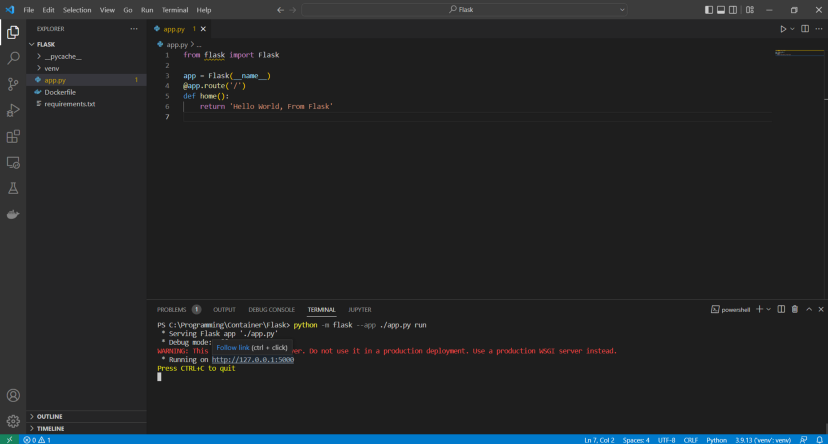
Flask Application Code
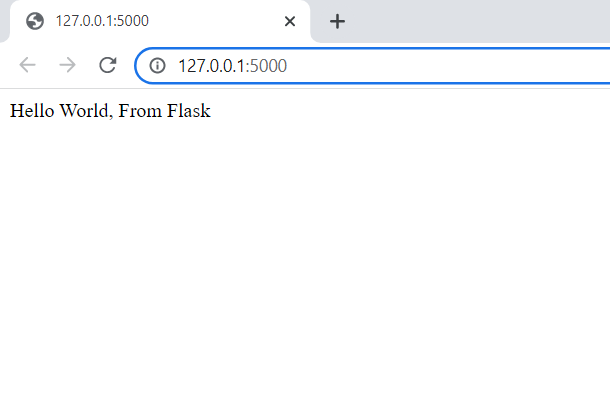
Flask Application Output
This only prints the text “Hello World” on a webpage, a relatively simple code. Now we will containerize it using the following commands via a Dockerfile.
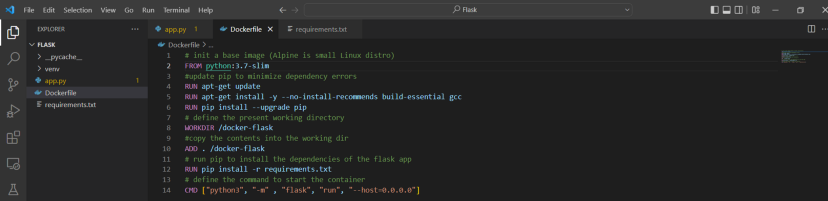
Dockerfile Code/Script
Each line in the above code is used to specify a layer in the Docker image. Whenever a Docker image is pushed/pulled (uploaded/downloaded) you will see it is done in layers as shown below.

Docker Layers
The advantage of Docker image is that it can be distributed but that is not its only feature. In the programming world, there is a phrase used very often “It worked on my machine”. Docker solves this issue as everything the application needs is provided in the Dockerfile which has been built into a Docker image. But this does not mean Dockerfile is without its issues.
3. Problems in Dockerfile:
Some of the problems of Docker are
Resource management, specifically space management. Whatever code/application is being containerized, requires a respective compiler/interpreter.
Another is when moving from one layer to another, data that is not required is also copied.
The more layers you have the heavier the image will be.
Using a heavy base image.
These are some of the reasons why a Dockerfile is heavy in size. The Docker image composed above is about ~430 MBs but only has 6 lines of code. Although 430 MBs may not look like much, my image only has flask dependencies but an actual application will have more than one dependency causing its size to be well over 2 maybe 3 GBs. Having a large image size can cause various problems.
Problems with Heavy Container Images:
If the size of the images is high it can cause problems in terms of Supply Chain Security. Supply Chain Security can be defined as
Heavy images are often a cause for concern as they are vulnerable, take a very long time to upload, and can compromise supply chain security. Attackers usually look for a vulnerability that would give them initial access to the container environment and then try to take over the host environment, steal credentials and insert backdoors. An attack on a container can open the doors for attackers to a much wider software supply chain network. Many attacks that are done are done on images that are heavy due to which they are full of vulnerabilities. To be somewhat protected from this, we need to start decreasing our image sizes. For that Docker has a solution, which is known as Docker multi-stage build.
4. What is Docker Multi-Stage Build?
Docker multi-stage build is a process of creating a Docker image through a series of steps. Each stage is used to complete a certain objective such as loading or removing build tools from the base Docker image. The Docker multi-stage process has lots of uses such as it is used to lessen the size of the Docker images by removing build tools to compress the total image size. In a multi-stage build, you use multiple FROM statements in your Dockerfile. Each FROM instruction can use a different base and each of them begins a new stage of the build. By default, the stages are not named but are referred to by their integer numbers, starting from 0. An alias can be used by adding an AS at the end of the FROM instruction.
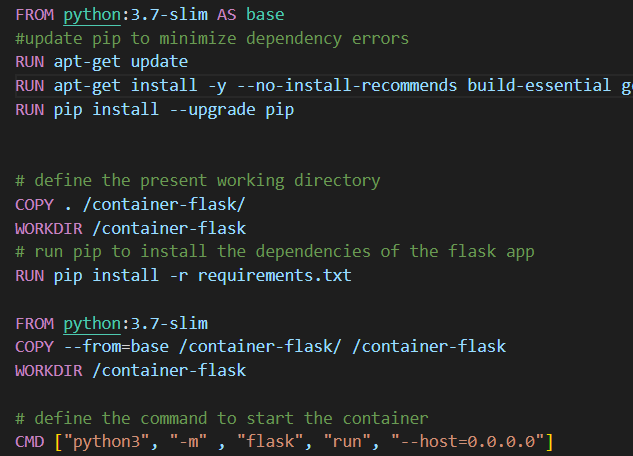
Docker Multi-Stage Build Code/Script for Flask Application
5. Why use Multi-Stage build:
There are many benefits to multi-stage build such as
Debugging a specific build stage.
It can be used to decrease the overall size of the image by removing duplicated work.
An external image can be used as a stage.
A previous stage can be used as a new stage.
Intermediate Image layers can be made shareable.
Make the process faster by specifying a cached image that can be used for subsequent builds.
Create a single Dockerfile with multiple stages instead multiple Dockerfiles.
Usually, what people do is they work on their application, then containerize it, and then they may or may not use a slimmed-down version for production. Multi-Stage build can be used in any phase of the DevOps workflow.
Now going back, if we were to convert our Dockerfile into a multi-stage build let’s see what the results would be.

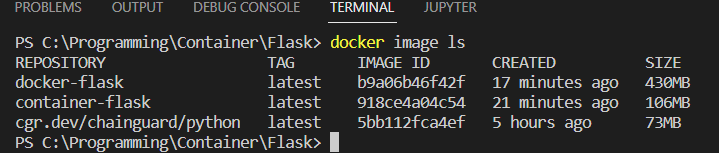
The size difference between a standard and a Multi-stage Dockerfile
As you can see there is an almost 78% decrease in the overall size of the image. We can further decrease the image size either by using lightweight base images or another tool such as kaniko.
Lightweight Base Images:
As explained earlier, the more layers we have the heavier the size will be. To decrease the overall size we can use lightweight images that include tags such as alpine or slim. Recently, a company known as Chainguard released a set of new images which are even smaller in size compared to the ones available. Using our example when we use a chainguard image our image size drops to 70 MBs.
Kaniko:
Another way to reduce image size is to use kaniko. Kaniko has many advantages such as a layer-by-layer analysis option. Using this we can analyse which of our layers are unnecessarily taking up space. You can find more about kaniko here.
6. Conclusion:
Normal Dockerfiles although helpful, are full of drawbacks such as a heavier image. Larger images have a high number of vulnerabilities that shouldn’t be missed for the sake of speed and they can cause problems in the supply chain security. Multi-stage build fixes these issues and then some. The multi-stage build makes it very much easy to create optimized images, we can also use other tools such as Kaniko and lightweight base images such as those provided by Chainguard. I hope this blog helps you in understanding and creating multi-stage Dockerfiles. My intention in this post was to show the benefits and effectiveness of multi-stage Dockerfiles and why image size should be as small as possible.
References:
https://docs.docker.com/build/building/multi-stage/
https://www.techtarget.com/searchitoperations/tip/A-beginners-guide-to-a-multistage-Docker-build#:~:text=A%20multistage%20Docker%20build%20is,part%20of%20the%20compilation%20process
https://earthly.dev/blog/docker-multistage/
https://appfleet.com/blog/speed-up-docker-builds-with-multi-stage/
https://pythonspeed.com/articles/faster-multi-stage-builds/
https://yashmehrotra.com/posts/building-minimal-docker-images-using-multi-stage-builds/
https://www.spiceworks.com/tech/devops/articles/container-vulnerability-supply-chain-risk/
https://www.docker.com/blog/the-impacts-of-an-insecure-software-supply-chain/
https://www.chainguard.dev/
https://github.com/chainguard-images
